
| Getting your Trinity Audio player ready... |
Hey friend,
Holiday decorating weekend usually starts the same way. You open the bin and find the lights in one big knot. You untangle a string, plug it in, and half of it stays dark. Or you find that out outside, on a ladder, after the string is already hung along the porch rail.
That is the part of holiday decorating I would fix first. It takes about an hour, and you can do all of it on the floor instead of the ladder. It matters for two reasons. The first is time: every dead string you find after it is hung means a trip down, a trip to the store, and a trip back up.
The second is safety. The U.S. Consumer Product Safety Commission (CPSC) estimates about 15,000 holiday decorating injuries treated in emergency rooms, and falls are the most common, at 34% of cases. Damaged cords and overloaded outlets add a fire and shock risk on top of that. The fewer trips up a ladder, the better.
Many of us put our holiday lights up the weekend before Thanksgiving, out of tradition, in anticipation of guests the big Thanksgiving weekend or, in Houston at least, while the weather is still mild, so now is a good time to get ready. Here’s how to test, sort, and power your lights before anything goes up.
Step One: Test Every String on the Floor
Lay out every light string and extension cord you own. Plug each one in, one at a time, and look at it with the lights on. Then run your hand along the cord from end to end and check for:
- Cracked or broken sockets
- Frayed or bare wire
- Loose connections at the plug or between bulbs
A string with any of these should go out. The CPSC advises throwing away damaged sets, and it’s not worth the risk to save a few dollars. Check the tag on each set, too. A red UL label means a set is approved for indoor and outdoor use, and a green one means indoor only.
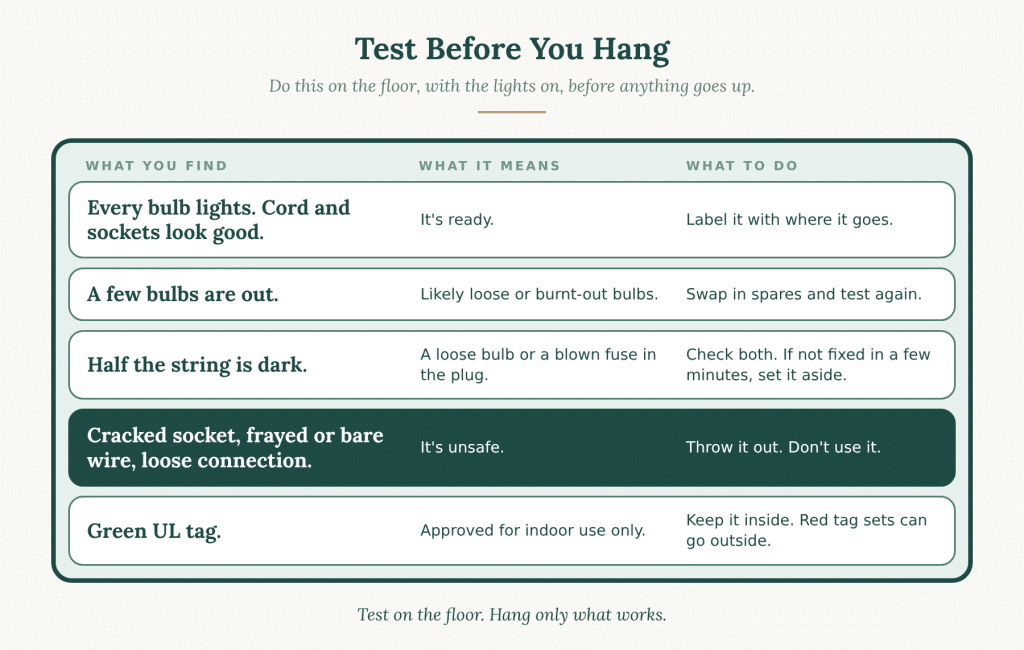
If a string is partly dark, give it a few minutes. A loose bulb or a blown fuse in the plug is a common cause, and many sets come with spares in the package. If it isn’t fixed after a short try, set it aside. A string that takes twenty minutes to repair is rarely worth the time.
Step Two: Sort and Label Each String by Where It Goes
Once you know what works, decide where each string will go. Put a strip of masking tape on the plug end of each one and write the spot on it: “front tree,” “porch rail,” “mantel,” “window.” Keep the strings together in a bin or bag by location. On decorating day, you’ll pick up a labeled set and hang it, instead of searching through a pile for something that fits.
This is also the time to edit. Most households own more strings than they hang. If you didn’t use a set last year, or you have six strings that are all slightly different colors and lengths, you probably don’t need all of them. Keep what you use, and let the rest go.
Step Three: Plan Your Power Before You Hang Anything
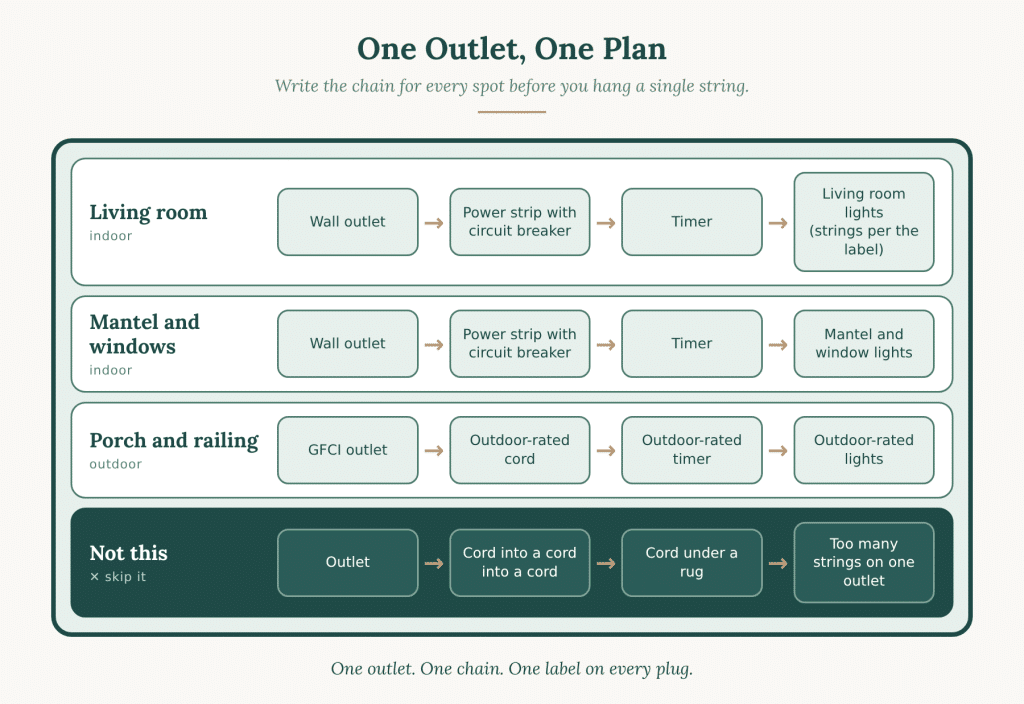
Walk to each spot you plan to light, find the nearest outlet, and write down what will be plugged into it. Then check the label on each light set for how many strings can be connected end to end. Older incandescent mini lights are often limited to three strings per connection, and many LED sets allow more, but the label for your set is the rule. Never go past it.
A few rules keep the power side simple:
- Use a power strip with a built-in circuit breaker for added protection.
- Measure the distance to the outlet first, and buy the right length of cord. Don’t plug one extension cord into another to reach farther.
- Never run a cord under a rug or beneath furniture, where it can overheat or fray.
- Keep cords out of walkways, so no one trips over them.
Every cord should have a route, the same as the cables on a desk. If you have a tangle of those too, I wrote about it in how to organize a desk buried in hardware, peripherals, and wires.
Step Four: Set Up Outdoor Lights for Houston Weather
Outdoors, use only light strings and extension cords rated for outdoor use. Plug them into a ground-fault circuit interrupter (GFCI) outlet, which cuts the power if the current changes unexpectedly. If your outdoor outlet isn’t a GFCI, a portable GFCI adapter does the same job.
Houston’s weather can change in an afternoon, so keep connections off the ground and away from puddles, driveways, and walkways. A waterproof cover over each plug connection helps. Look up before you set the ladder, too, and check for overhead power lines near the spot where you’re working.
Step Five: Put Your Lights on Timers
Lights that turn on and off by themselves are easier to live with, and safer. Utilities advise turning decorative lights off late at night and when no one is home. A timer does that for you. Choose an outdoor-rated timer for anything outside, and set it for the hours you want, such as 5:30 to 10:30 in the evening.
After the Holidays
When you take the lights down, wrap each string around a piece of cardboard or a cord wrap, and leave the masking tape label on the plug. Write the year on the bin, such as “Lights, tested 2026.” Next year, you’ll know the strings in that bin worked when you packed them.
Store the bin in a closet or on a shelf indoors if you can. Heat is hard on cords and plastic, and a Houston garage or attic gets very hot. I covered what to keep out of those spaces in what not to store in a Houston garage or attic.
The Shopping List
Check what you have first, then buy only what fills a gap. Here’s what I’d look for:
- Spare bulbs and fuses, or a light string tester
- Outdoor-rated extension cords, in the lengths you measured
- A power strip with a built-in circuit breaker
- Outdoor-rated timers
- A portable GFCI adapter, if your outdoor outlet doesn’t have one
- Waterproof covers for plug connections
- Cord wraps or cardboard reels for storing the strings
- A lidded storage bin, plus masking tape and a marker for labels
Holiday decorations are the one category most people only touch once a year, so the bins often hold more than anyone remembers. If yours has outgrown the shelf, and you’d like someone to look at it with you, that’s what my Virtual Home Audit is for. It’s a live video walkthrough where I help you spot what’s costing you and tell you what to fix first. If you’d rather have hands-on help, as a decluttering expert and professional organizer I work with clients in person across the Greater Houston area and virtually from anywhere. Book a session here, call 832-271-7608 to get started even faster, or, if you still have questions, complete the form below. I’ll answer them as quickly and completely as possible.

Working with Taya and her team is easy. You can book an appointment easily on her website, or contact her directly at 832-271-7608
- How to Organize Holiday Lights Before You Decorate - November 9, 2026
- Decluttering So Your Kids Don’t Have To: A Gentler Way - November 6, 2026
- How to Talk to Your Parents About Decluttering - November 3, 2026